Showing posts with label finish. Show all posts

Wednesday, July 23, 2014

A Chance of Rain

I haven't named this one officially yet, but it's made from April Showers charms so I thought a 'rain' name would be fitting.

I finished it up last night and gave it a washing.  (Note to self: do not use towels in the wash with a navy quilt.  The fuzz will require some serious sticky roller attention!  Next time use pillowcases or anything lint free to balance out the washer!)

This is always one of my favorite places to photograph my quilts.  I like the way the quilt hangs, but I really just love the background (even when the grass needs mowing).  I think I need to get my BoyChild, BabyBrother, and Nephew to build me a section of split rail fencing here just for photographing my quilts!


On the porch rail.  


The "roll" .... even though mine is rolled a bit haphazardly, I still like it.  


These are quick photos with my phone.  I will be taking more (and hopefully) better photos later with my real camera before adding to my Etsy site.  


There is minimal quilting on this one ... mostly I went along (just inside of) all the navy blue seams. 


If you're interested before I get it on my Etsy listing, just drop me an email or leave a comment here.  It measures approx 40" x 47" after washing.  Charms are April Showers, blue is Bella Solids, backing is flannel from Hancock Fabrics.  Binding is a print from April Showers.  It has been pre-washed with unscented detergent and fabric softener.  I will wash it again before shipping to remove any dust/dirt that may have been picked up during photographing.  Cost is $85 + shipping (medium flat rate priority mail box $12.00)

Update:  I now have THIS QUILT listed in my ETSY SHOP.

And remember to visit all the great folks listed in my righthand sidebar who generously allow us to link up our projects every week.  I know you'll be inspired by what you see!

Friday, May 2, 2014

Triangle Quilt FINISHED!

YAY!!  FINISHED!!
(Picture Overload Alert!)

I've been working on the Triangle Quilt Along with Paula @ The Sassy Quilter for .... oh, about six weeks now I think.  (It doesn't really seem like that long!) 

I picked my fabrics ..........


Cut them out .......


Got them on the design wall ....


Started sewing them together ....


My backing fabric arrived ....
 

My top got finished ...


I got it quilted and started attaching the scrappy binding ... 


And now .... FINISHED!!


My Mom always "needs one of those" whatever I'm making, so this time she's getting it.  


She has seen snippets of it when Gabbie would be looking at pics on my phone, but she doesn't get to get a good look at it (Gabbie doesn't let anyone else hold my phone!) so hopefully this will be a surprise.

Triangle fabrics: cotton quilting prints purchased in store at Hancock Fabrics.
Backing: "New York State of Mind Brick Wall Grey by Bernatex, online @ Fabric.com
Thread: Aurifil 50 wt Color 2615
Binding: scrappy, from leftover triangle prints.
All sewn and quilted in my living room on my Brother cs6000i. 

Approximate size (before washing) 54" x 62"

Linking up today with the final Quilt-Along linky party.  
You should come check out all the great quilts.  So many made with the same pattern yet they are all so different!! 

Also linking up with:
Fabric Friday Frenzy @ Fort Worth Fabric Studio
Amanda Jean @ Crazy Mom Quilts
Link A Finish Friday @ Richard & Tanya Quilts
Getting My Whoop on with Sarah @ Confessions of a Fabric Addict
Needle & Thread Thursday with Kelly @ My Quilt Infatuation
Marelize @ Stitch By Stitch

(You can find links to all these and many other great blogs/linkys in my right-hand sidebar)


Sunday, December 8, 2013

Got 'Er Done!

The John Deere commissioned quilt is all done!  

It is pouring rain and is supposed to pour rain for three days, so this is as good as it gets for pictures. 

Crappy phone pictures in crappy artificial lighting.  


The label says 'From Santa & Mrs Claus - 2013'. 


 It's all soft and crinkly and when I took it out of the dryer I almost snuggled up in it instead of putting it away for it's new owner.  

Finished size:  approx 60 x 80
John Deere Fabrics from Hancock Fabrics
Quilted with Coats and Clark 30 wt cotton thread
Warm and White batting

Check my right-hand sidebar for links to all the great blogs I am linking up with this week!!

Friday, October 18, 2013

Lot Of Firsts ...


I followed this tutorial for the Cookie Plate Crumb Catcher from The Crafty Quilter.  

I still have to give it a final trim and bind it - probably in solid red, which I don't have any of.  I think the red/white print would make a good binding but I don't think I have enough of it left.  Not without a whole lot of piecing.  


Lots of firsts in this for me.  First time for HST's, square in square, and pinwheels.  Also, I didn't do just straight line quilting.  Well yes, all the quilting lines are straight (or relatively so), but it's not just lines all the way across the whole thing.  

I had trouble visualizing the layout and getting my colors where I wanted them - in retrospect I wish I'd reversed the fabric layout between the black triangles and the green squares.  But still, not bad for a first go.  And it's made with some random fat quarters I picked up at Hancock Fabrics last week for $1 each, so it was a thrifty little project.  


I also used different color threads top and bobbin.  It turned out ok, but I'm not sure it's something I'd do for a bigger project.  At least not without a lot more practice and some major finagling with the tension settings to make sure the threads don't pull through.  The quilting doesn't really show up with the red bobbin, but I am glad I didn't go with the white in the bobbin.  Maybe some gold would've been nice?  

I recommend this for a quick easy project. 

Getting my Whoop on today with Sarah.

EDITED TO UPDATE:
I just couldn't leave it alone.  But wow, binding this little bugger was a chore!


And .... since I actually finished it, I'm also linking up with Richard (&Tanya Quilts), and Amanda Jean (Crazy Mom Quilts)

Sunday, August 25, 2013

FINISHED! Hexies By Halves Quilt-Along

A few weeks ago I started the Hexies By Halves Quilt Along with Polly.  

Today I finished my quilt!!

It finished at 44" x 59" after washing.  

(I forgot to measure before washing but it was around 46" wide because 45" backing was not quite wide enough!)

I used a half-yard bundle of Red White and Currant by Henry Glass purchased from Sisters and Quilters.  (I did not use all the fabrics, and did not use the full half-yard of any of the fabrics).

Backing was purchased at Hancock Fabrics (I don't know what it is, but I labored long and hard over the decision).  I took swatches of the hexies with me and pulled and put back bolt after bolt.  I knew I wanted a gray color ... and I knew 45"would not be wide enough so it would need to be pieced.  So I got a mottled gray print that wouldn't really show the seam where I had to piece it.  

I finally finished the binding this morning.  On all (uhm, both) of my previous quilts I've machine bound both the front and back and loved the results.  I tried that with this one but was not hating the way it looked, so I ended up machine sewing to the front and hand sewing the back.  

Overall I'm pretty happy with how it turned out.  I did have one little spot on the back where there was a pucker that I didn't see until after it was quilted over.  It's really minor and close to one edge and I decided I could live with it.  

This is a great pattern and Polly's tutorials were very easy to follow.  Cutting the first couple of fabrics was slow (for me) because I was trying to be very careful and make sure everything lined up perfectly.  After I got a rhythm going it went very fast.  

Polly will soon be offering this pattern in her Etsy shop.  If I can do this as my third quilt, anybody can do it!  

You can see progress pics on my facebook page but here are the final pics.

These were taken the moment I finished the binding.  Indoors with very poor lighting.

Kid tested and approved!! 


We then moved outside, where she wanted the gray side.  (She seems to prefer the back of all my quilts over the front!)


 But she likes the front too!


All the following pictures were made after the wash.  I was sooooooo thankful those reds did not run! (I used two Shout color catchers and they were only slightly pink after the first wash, so I ran the wash again and used one color catcher that came out completely white.  Yay!)


(I've edited this post to add these pics made later with a different camera that I haven't used in years! What a difference a good camera makes!)


 I will be using the pattern again in the future.  I think these large hexies would really look great on a queen or king sized bed.

************************
Please remember to check the linky parties listed in my right-hand sidebar to see hundreds more great finishes and works in progress!  Thanks so much to everyone who hosts a linky party, and to everyone who shares.  You all inspire me every day!!

Tuesday, July 30, 2013

Finally Finished!

Notice: This post might be considered picture overload!
 
Way back on June 8th I went shopping looking for fabric for a floor quilt / play mat for Miss Sadie.
 
I found this:
 
 
On June 17th I got the top done:
 
 
Then on June 26th, I did some stitching in the vicinity of the ditch, and some straightish line quilting:
 
 
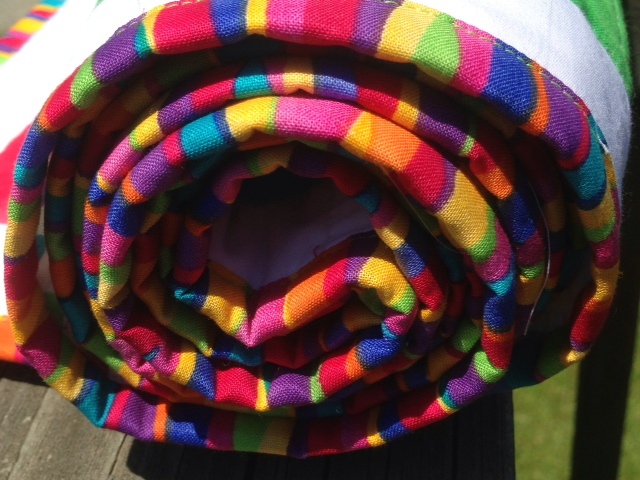
Last weekend I finally found some great fabric for the binding.  Actually, it's a good thing it took me so long to get around to buying the fabric and binding the quilt because those few short weeks ago I would have never ever considered using striped binding for a dotted quilt!
 
 
And I can't even begin to describe how much I love my wonder clips! 
 
 
Thanks so much to all my blogger friends who post such great projects and share their ideas via tutorials with lots of closeup pics and details - and even a few youtube videos!  I did have to pull out the binding on the first corner ... in spite of fantastic tutorials I still managed to mess up that first corner so it wouldn't fold over and miter correctly.  (I have a really close personal relationship with my seam-ripper!)
 
And now ......
 
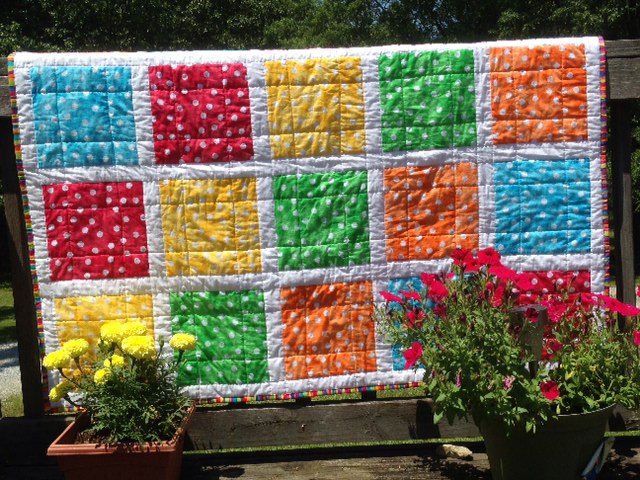
It's finished!!


I can't wait for Sadie to come visit so she can play on it!
 
**************
Please visit the fine folks on my righthand sidebar who so graciously sponsor linky parties for us every week!